

CONNECT HELPCENTER · ORDERS AND CUSTOMERS
Store administrators: team overview and secure access management
Review who accesses your store administration, find a team member, check account activity, and open the form to add a new user through the designated path.

The screenshots use the English interface and sample data. Numbers link locations in the image to the localized instructions. Click the image for a larger view. Actual orders and customer data were not changed for the demonstration.
Path to seller administrators
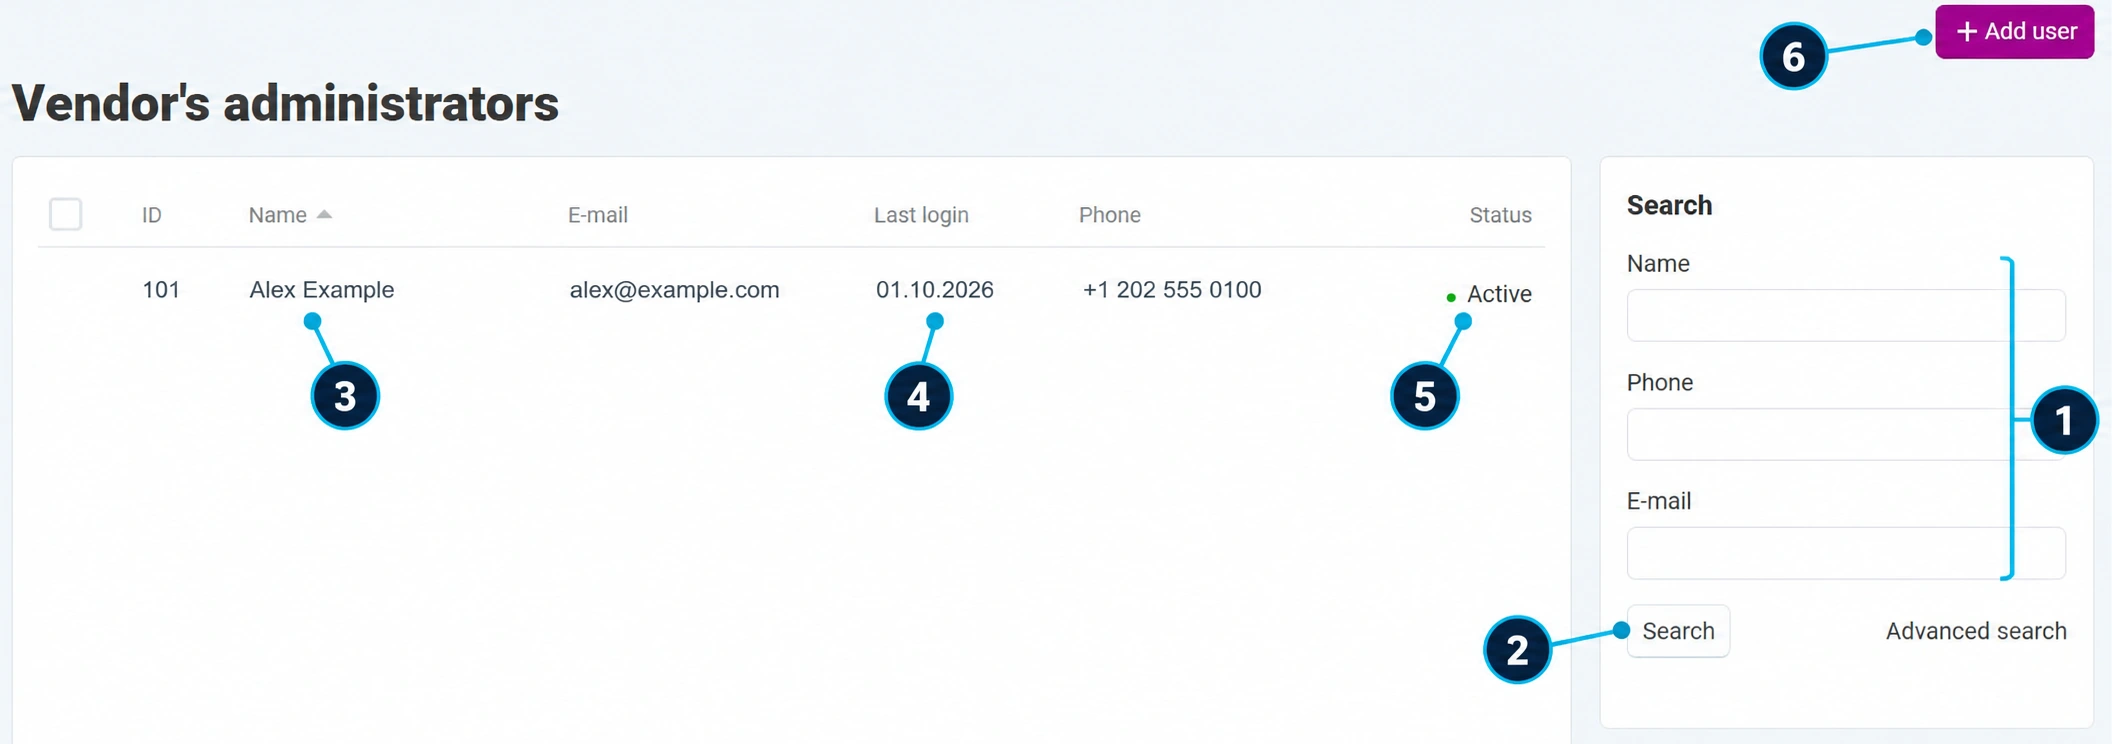
Open Customers → Customers → Seller administrators. The button in the customer list opens the employees of your store. In the English interface shown in the screenshot, it says Vendor’s administrators. This is a list of people who work in the administration, separate from customers and delivery personnel.
- 01
Find a team member
Enter the name, phone number, or email in the search on the right (1). Use the official email to distinguish between similar names.
- 02
Apply criteria
Click Search (2). If the user is not visible, remove the filters and check the store before opening a new account.
- 03
Open the team member’s profile
The name (3) leads to their account according to your permissions. Verify their identity before editing. Your own profile is edited according to separate instructions.
- 04
Check the last login
The date (4) helps review account usage. It is not a complete record of all actions, nor proof of who physically used the device.
- 05
Check the status
The status (5) shows whether the account is active. Account activity and the scope of assigned permissions are separate settings.
- 06
Add a new employee
Add user (6) opens the form. The complete procedure with individual fields is available in Adding team members.
Onboarding a new team member
- 01
Check whether an account exists
Search for the official email. Do not create a duplicate because the user forgot their password; use access recoveryfor this.
- 02
Prepare identity and responsibilities
Determine the name, contact details, and duties: catalog, orders, support, or another responsibility. Each person should have their own account for clear accountability.
- 03
Open and complete the form
Follow the team-addition guide, check the store and required fields. Do not publish passwords in screenshots, order notes, or messages to customers.
- 04
Align permissions
For limited roles, agree on the scope with Connect administration according to roles and permissions and user groups. Do not assume that all employees need full access.
- 05
Save and verify the login
After creating the account, reopen the list and check it. The new user should confirm that they can log in and see exactly the functions they need.
Change of duties or an employee’s departure
Review access when duties change or cooperation ends. Align responsibilities for open orders, calls, and conversations, then revoke access according to account security. If the status or permissions are not available to you, send a request to Connect administration.
Do not share one administrator account among multiple people. The work history and related business records should be preserved; changing access should not mean deleting orders or conversations.
Can’t see the button or save?
Check that you are working in the administrator account for the appropriate store and have the required permissions. Tell support the desired action and the system message. Do not send the user’s existing password.